No edit summary Tag: Visual edit |
(v406.7) |
||
| (8 intermediate revisions by one other user not shown) | |||
| Line 1: | Line 1: | ||
{{infobox region |
{{infobox region |
||
| − | | |
+ | | biome = Low Desert |
| − | | |
+ | | type = Claimable |
| − | | |
+ | | temperature = |
| − | | subbiome = North Western Tundra |
||
| − | | isspawn =no |
||
| − | | temperature = 6°C / -18°C |
||
}} |
}} |
||
| − | ==Description== |
||
| − | C3 is a region in the "North Western Tundra". Most of the time, the temperature in this region is below 0°C and it should only be visited with clothing that has enough thermal insulation to avoid the deadly status effect [[Hypothermia]]. During a strong Cold Front the temperature might even sink down to -20°C. All islands in this area have massive amounts of berries, meaning that players will never run out of [[Vitamin C]]. [[Fibers]] and [[Vitamin A|herbs]] can also be found frequently here. However, one drawback of this area is, that it has no pure metal stones, like many other zones on horizontal 3. |
||
| − | == |
+ | ==Discoveries== |
| + | {{:Discoveries/C3}} <!-- This list can be edited at https://atlas.gamepedia.com/index.php?title=Discoveries/C3&action=edit --> |
||
| − | {| class="wikitable sortable" |
||
| − | |- |
||
| − | ! Grid !! Name !! Island !! Longitude !! Latitude |
||
| − | |- |
||
| − | | [[Region C3|C3]] || The Depraved Reef || - || - || - |
||
| − | |- |
||
| − | | [[Region C3|C3]] || Gartry Peninsula || - || - || - |
||
| − | |- |
||
| − | | [[Region C3|C3]] || Willy's Hill || Salismar Cay || 00.00 || 00.00 |
||
| − | |- |
||
| − | | [[Region C3|C3]] || Salismar Cay || Salismar Cay || -67.13 || 65.57 |
||
| − | |- |
||
| − | | [[Region C3|C3]] || Captain's Puzzel || Salismar Cay ||-68.27 |
||
| − | | 64.69 |
||
| − | |- |
||
| − | | [[Region C3|C3]] || The Flying Horsehair || Camware Isle || -66.17 || 69.40 |
||
| − | |- |
||
| − | | [[Region C3|C3]] || Camware Isle || - || - || - |
||
| − | |- |
||
| − | |C3 |
||
| − | |Monument of Glory |
||
| − | |Garty Peninsula |
||
| − | | -64.16 |
||
| − | |64.86 |
||
| ⚫ | |||
| − | |||
| ⚫ | |||
| − | *{{ItemLink|Basalt}} |
||
| − | *{{ItemLink|Cotton}} |
||
| − | *{{ItemLink|Granite}} |
||
| − | *{{ItemLink|Lignite}} |
||
| − | *{{ItemLink|Iron}} |
||
| − | |||
| − | ==Discovered Consumables / Plants== |
||
| − | *{{ItemLink|Arctic Raspberry}} |
||
| − | *{{ItemLink|Garlic}} |
||
| − | *{{ItemLink|Lignonberry}} |
||
| − | *{{ItemLink|Rosemary}} |
||
| − | |||
| − | ==Discovered Animals== |
||
| − | *{{ItemLink|Crow}} |
||
| − | *{{ItemLink|Horse}} |
||
| − | *{{ItemLink|Lion}} |
||
| − | *{{ItemLink|Pig}} |
||
| − | *{{ItemLink|Sheep}} |
||
| − | *{{ItemLink|Wolf}} |
||
| − | *{{ItemLink|Bear}} |
||
| − | *{{ItemLink|Tiger}} |
||
| − | *{{ItemLink|Bull}} |
||
| − | *{{ItemLink|Cobra}} |
||
| − | *{{ItemLink|Rattlesnake}} |
||
| − | *{{ItemLink|Seagull}} |
||
| − | *{{ItemLink|Turtle}} |
||
| − | *{{ItemLink|Tuna}} |
||
| − | *{{ItemLink|Manta Ray}} |
||
| − | *{{ItemLink|Shark}} |
||
==Islands== |
==Islands== |
||
| + | {{IslandInfo|Region=C3|Name=Bloomslis |
||
| − | ===Camware Isle=== |
||
| + | | Creatures = |
||
| − | {{MapLocations|map=Region C3.jpg|borderCoordT=73.33|borderCoordR=-60|borderCoordB=60|borderCoordL=-73.33|text=Camware Isle|mapsize=256|69.03,-65.23,55,0,Camware Isle}} |
||
| + | | Consumables = |
||
| ⚫ | |||
| + | | Remarks = |
||
| ⚫ | |||
| + | {{IslandInfo|Region=C3|Name=Bergamot Atoll |
||
| − | ===Gartry Peninsula=== |
||
| + | | Creatures = |
||
| − | {{MapLocations|map=Region C3.jpg|borderCoordT=73.33|borderCoordR=-60|borderCoordB=60|borderCoordL=-73.33|text=Gartry Peninsula|mapsize=256|65,-64.25,27,0,Gartry Peninsula}} |
||
| + | | Consumables = |
||
| + | | Resources = |
||
| + | | Remarks = |
||
| + | }} |
||
| + | {{IslandInfo|Region=C3|Name=Terhill Enclave |
||
| − | ===Salismar Cay=== |
||
| + | | Creatures = |
||
| − | {{MapLocations|map=Region C3.jpg|borderCoordT=73.33|borderCoordR=-60|borderCoordB=60|borderCoordL=-73.33|text=Salismar Cay|mapsize=256|65.14,-67.94,53,0,Salismar Cay}} |
||
| + | | Consumables = |
||
| − | |||
| + | | Resources = |
||
| − | ===The Depraved Reef=== |
||
| + | | Remarks = |
||
| − | {{MapLocations|map=Region C3.jpg|borderCoordT=73.33|borderCoordR=-60|borderCoordB=60|borderCoordL=-73.33|text=The Depraved Reef|mapsize=256|69.25,-69.82,30,0,The Depraved Reef}} |
||
| + | }} |
||
{{Nav regions}} |
{{Nav regions}} |
||
| − | [[Category:Regions]] |
||
Latest revision as of 00:35, 28 July 2020
| Region C3 | |
|---|---|
| |
| Region | |
| Biome | Low Desert |
| Type
|
Claimable |
| Temperature | ? |
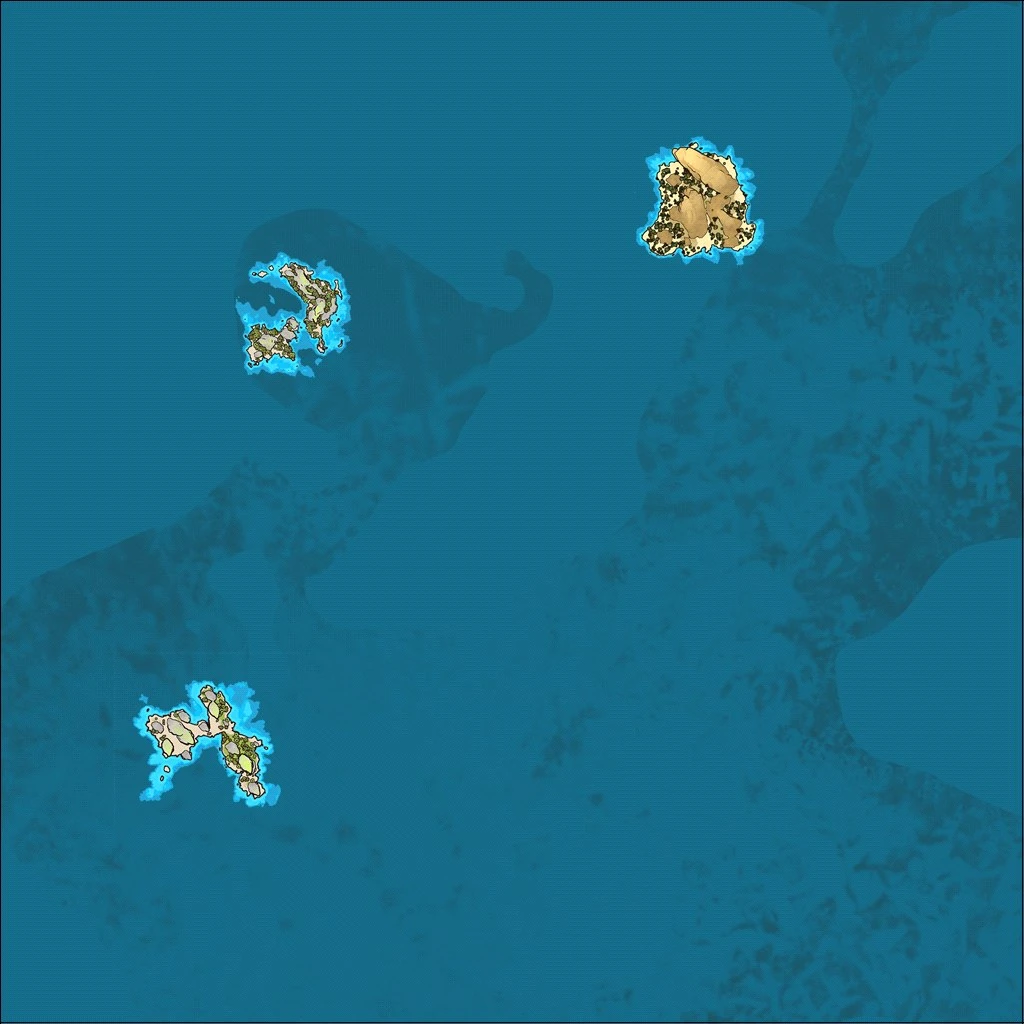
Discoveries[ | ]
| Grid | Discovery name | Longitude | Latitude |
|---|---|---|---|
| C3 | Bloomslis | -51,33 | 60,17 |
| C3 | Bergamot Atoll | -58,43 | 58,08 |
| C3 | Terhill Enclave | -60,07 | 50,33 |
Islands[ | ]
Bloomslis
| Bloomslis | Creatures | Consumables | Resources |
|---|---|---|---|
|
|
|||
Bergamot Atoll
| Bergamot Atoll | Creatures | Consumables | Resources |
|---|---|---|---|
|
|
|||
Terhill Enclave
| Terhill Enclave | Creatures | Consumables | Resources |
|---|---|---|---|
|
|
|||
All regions
| A | B | C | D | E | F | G | H | I | |
|---|---|---|---|---|---|---|---|---|---|
| 1 | A1 | B1 | C1 | D1 | E1 | F1 | G1 | H1 | I1 |
| 2 | A2 | B2 | C2 | D2 | E2 | F2 | G2 | H2 | I2 |
| 3 | A3 | B3 | C3 | D3 | E3 | F3 | G3 | H3 | I3 |
| 4 | A4 | B4 | C4 | D4 | E4 | F4 | G4 | H4 | I4 |
| 5 | A5 | B5 | C5 | D5 | E5 | F5 | G5 | H5 | I5 |
| 6 | A6 | B6 | C6 | D6 | E6 | F6 | G6 | H6 | I6 |
| 7 | A7 | B7 | C7 | D7 | E7 | F7 | G7 | H7 | I7 |
| 8 | A8 | B8 | C8 | D8 | E8 | F8 | G8 | H8 | I8 |
| 9 | A9 | B9 | C9 | D9 | E9 | F9 | G9 | H9 | I9 |